Tuesday, May 29, 2012

Steam-bending the carlins

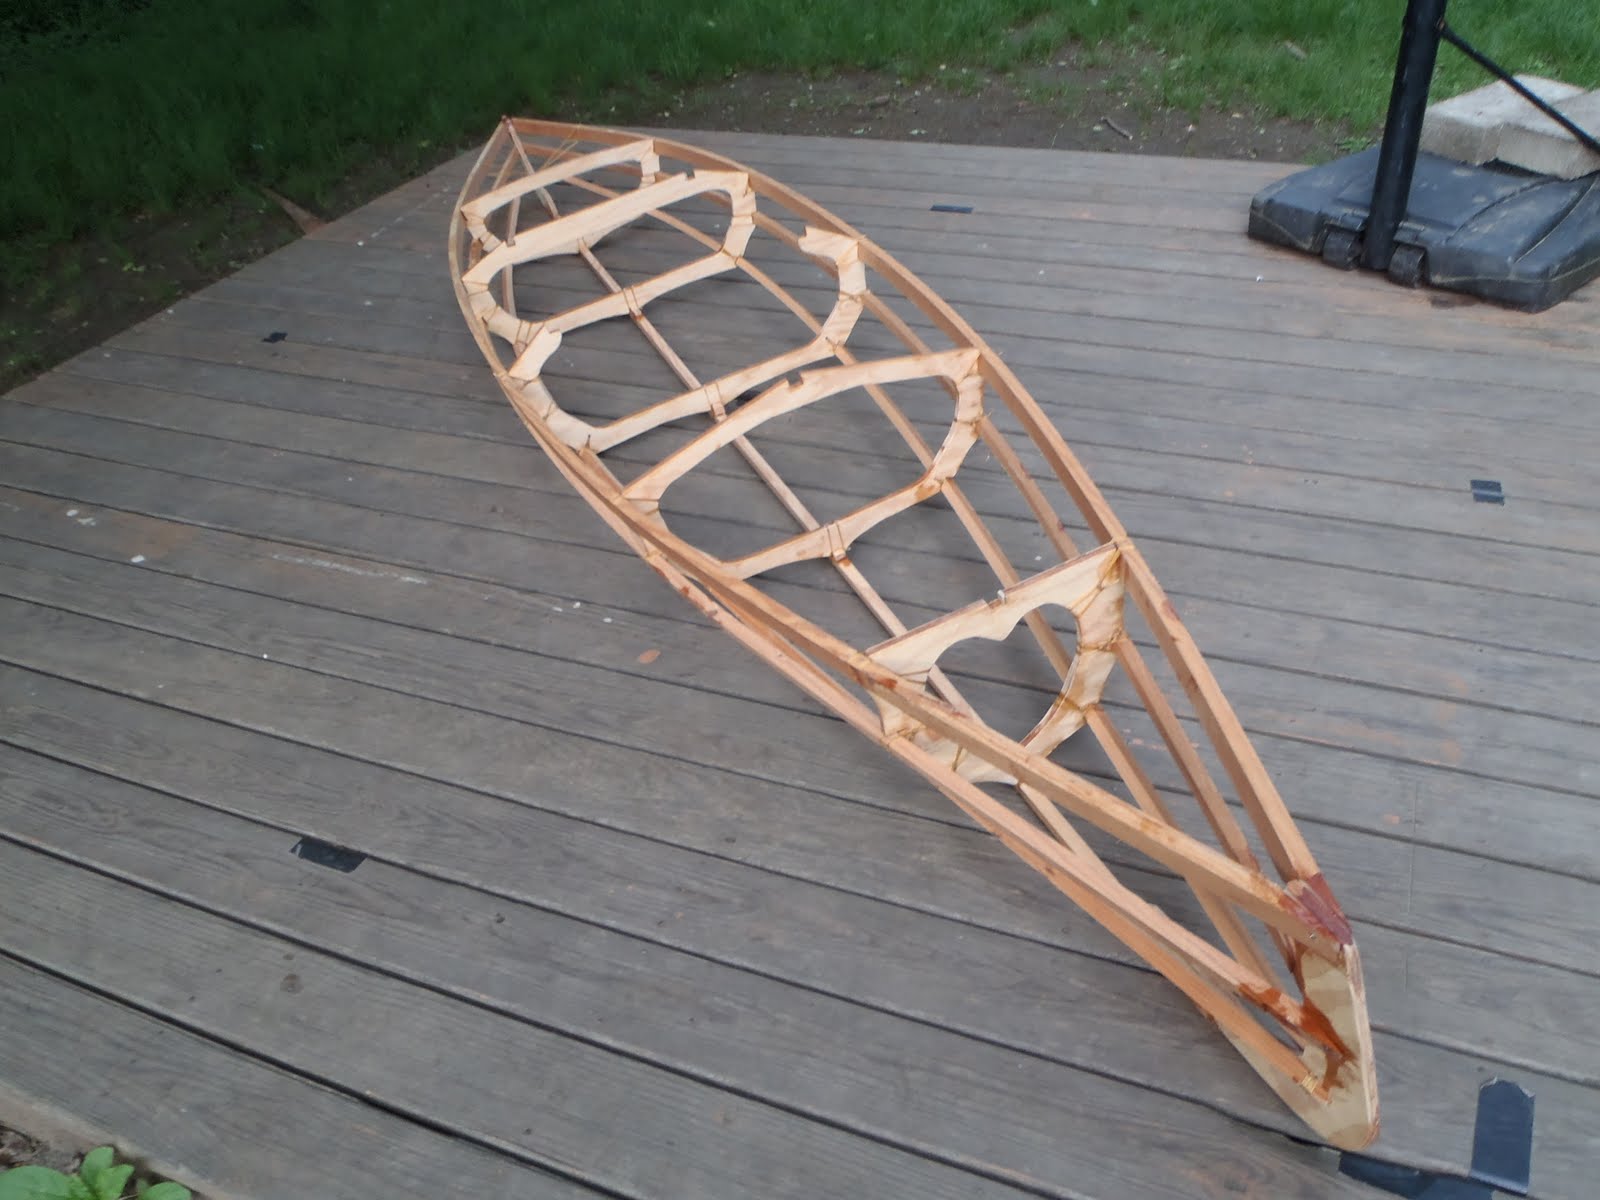
Over the last couple of days I put an hour or so into sanding the frame.  Ticklish work: sanding each stringer on all four sides without touching the lashings--which would instantly fray.  (When I do this with the kids, we will sand the stringers BEFORE we build--in fact, teams of two can each work on their stringer while one team cuts out their frame with the jigsaw and a second team watches to learn how it's done.  Phew! -bottle-neck relieved!

A few more things to complete the frame and prepare to skin it:
Bend and install cockpit carlins and deck beam.
Resaw strong-back and make floor boards from it.
Oil frame.

Today I steam-bent the carlins--a skill I'd never really used before.  The closest to steam-bending wood was pouring boiling water on gunwales to enable them to make the curve of the deck.  This was a bit more official: the carlins (already split for two feet to make bending easier) were suspended in a foil cone over a pot of boiling water for at least half an hour.  Then I rushed them (the pliability doesn't last longout to where I'd set up cinderblocks.  The ends rested atop cinder blocks and a third weighed down the middle.  When I'm done writing this, I'll take them into the garage and see how they fit!

The bending.

You can just make out the are split if you look at the left ends.  The steaming apparatus (minus the suspending rope and the pressurized gasoline stove that went underneath) is in the background.

Sunday, May 27, 2012

Building a Chuckanut 12 skin-on-frame kayak


Last spring, in preparing for my summer boat-building day camp at St. Andrew's Episcopal Church, I built a small paddling boat to test my ideas and get a feel for how it might work with kids.  The result was very heavy and clunky, and taught me how NOT to build a simple hull.  This year I was invited to give the program again but with middle-school youth, so I decided a more sophisticated boat was in order.

One of the boats built in the St. Andrew's Summer program.

I've become interested in the modern versions of skin-on-frame boats that were originally developed by the peoples of the far north, such as those known variously as Eskimos, Innuit, Aleut and Yupik.  Their seal-skin-covered boats, evolved in an environment where wood was incredibly scarce, ended up with hulls that were seaworthy yet very light--superior in many ways to those of the Europeans who first encountered them a couple of centuries ago.  The modern versions of these kayaks take full advantage of the properties of plywood for shaping the hull, and the durability and ease of use of nylon or polyester cloth for covering.  They have developed a reputation for lightness, durability, and--perhaps most importantly-- relatively fast and inexpensive construction. 

I have already built a two-man kayak that is quite good-looking and functional, yet--even though it is made mostly of expensive and light-weight 3/16-inch plywood--is still a bit heavy to for loading single-handed on the minivan roof rack.

 Serendipity, my B&B Yachts-designed Birder2, at her christening.

A skin-on-frame kayak involves (I thought) less use of dangerous edge tools and has jobs such as cutting out frames and tying lashings, that could occupy a fair-sized group of kids simultaneously--important values for my program.  Of course, I would have to build one first so I could program and organize the build into the time available and teach kids the necessary skills; and that--wouldn't you know--would give me a kayak of my own!  Several "professional amateur" designers offer skin-on-frame designs.  After settling on Dave Gentry's Chuckanut kayak, I wrote to him about the St. Andrew's summer camp program--he promptly donated a set of plans, even paying the postage!  (I bought the plans for the one-man kayak I am building for myself; Dave then donated the plans for a two-man kayak the kids will build.)

Progress so far--
I have been working rather slowly and fitfully, having cut out the frames with a jigsaw and ripped the long stringers on a table saw months ago.  I only just finished tying the lashings that make frames and stringers into a stiff and stable whole.  I still have to install the carlins that will define the cockpit edge, and a deck beam that will provide a stable place to attach things.  Once these are done I can "skin" the boat with heat-shrink polyester, shrink it taut with a hot iron, and paint the fabric to make it waterproof.  All that must happen in the next few weeks to be ready for the program, which begins in July.  On the other hand, I may put off skinning the boat until the program is well under way in mid-July--that way the kids can see the critical steps and goals before they have to perform them.

The end frames and keel begin attached to a "strong-back" of 2X4 pine to keep everything aligned in the beginning.

Figure-eight and over-hand knots secure the end of the "artificial sinew" used to tie stringers into notches in the frames.

A series of wraps around the frame and stringers, tightened by wraps around the wraps, make a strong but slightly flexible joint.

This open-ended frame makes for a generously-sized cockpit.

Stems are secured to the gunwales, keel, and other stringers by a combination of screws, epoxy, and lashings.

The frame, made of seven douglas fir stringers lashed to five plywood frames, is complete except for cockpit edges and a deck beam.

Mid-May on Lake Nippenicket

Got out in the yellow kayak a  couple of Fridays ago for an hour-long paddle around the east side of Nippenicket with my camera, photographing a riot of red-winged blackbirds and the landscape and flowers.  Collected a couple of plant specimens to ID, too.  Thinking about the idea of a little book: Nippenicket Through the Year.  The next day I and the boys spent two hours on the western shore and got lots more photos.  I also got a bad sunburn on my legs--especially my shins.  (Next time I will have something light-proof to cover them with!  -and sunscreen!)  This time I got some good photos of a great blue heron, among the hundred or so I took.  I have begun to catch on to the fact that my camera can't compete with the slrs with their big telephoto lenses: my camera takes pretty good amateur shots, but they would look very Mickey Mouse in a book.  Maybe my text could make up for that... 

Can you find both red-winged blackbirds?

Here is one family that knows how to enjoy the pond.


Kids out for a walk with Mom.

Yellow irises in bloom.


Royal fern (Osmunda regalis).

Trevor is entranced by the red-winged blackbirds.

Yellow water lily (Nuphar advena) and the insectivorous bladderwort (Utricularia inflata) in bloom.


A great blue heron...


...takes flight.

A willow (Salix cordata) in bloom.

Almost home.